It’s been almost exactly a year since I started writing and developing courses for Pluralsight’s video library. It was last year at WordCamp Salt Lake City 2012 that Megan first came up to me and asked me if I’d be interested and the 2013 SLC WordCamp passed just last weekend. Over that time, I’ve stumbled several times in figuring out the best way to get a course together and live into the queue. I’m currently finishing my sixth course and the last two have gone through the review and publish process virtually without a hitch. I feel like I have a good system going and thought that I’d share my process.
Outline
It all starts with an outline — which gets sent to my content editor at Pluralsight as a pitch. But even before I create an outline, I start sketching out my ideas on Trello. Trello has a great drag-and-drop interface for organizing ideas. It works really well as a brainstorming tool to organize my thoughts and put things together in a particular order before formalizing it into a specific outline. Once I’ve got a course mapped out on Trello — meaning I’ve created several different “lists” (which become the course modules) with different “cards” (which become ideas to explore in the course’s modules) laid out, I transpose that into an actual outline on Google Docs.
The outline is based off the Trello board, but also adds a little bit more detail, specifically in what each clip or topic might be covering. Each course starts off with an introductory module, where I talk about all the stuff that I’ll cover in more detail later on. The course I’m currently finishing off has a separate clip in the first module that focuses on each of the 3 topics that I then cover in depth in separate modules.
It’s very college prep English — your first paragraph is composed of a thesis statement, three supporting statements (which will be expanded on in the next 3 paragraphs) and a closing statement; that’s sort of how I built this course. It sounds horrible, but it works to keep me — and the course itself — organized.
This outline also includes a short course description and a long course description — both of which are used on the Pluralsight site — as well as descriptions for each module. This is to communicate to the content editing team what I plan to accomplish with the course and the modules, to keep myself straight as I start to write the modules, and to be used later when I’m creating the meta files that are used to build the course for their system.
Writing
Once the course outline has been approved, I start writing. This is probably the most time-consuming part. I’ve learned, though, that if I don’t write out the entire script before I start, I will end up regretting it — I’m not good at talking on the fly and this helps me organize my thoughts. So, I write the entire course, from front to back, as if I was saying it out loud. I usually write the way I talk anyway, and I try to keep that same voice as I’m writing the course. All the writing, of course, has already been mapped out in the outline I’ve already prepared, so it’s usually just a matter of expounding on the ideas I’ve already come up with and added to the outline. The script isn’t completely done at this point, it gets reviewed and edited several times between now and recording the audio, with new things being added or removed all the time. I generally consider the script to be changeable right up to the point that it’s been recorded and occasionally I’ll make last-minute changes as I’m recording the audio if something doesn’t sound good.
Slides
Once I’ve got the script written, I start preparing the slides for each module. I was using OpenOffice for this, and to create the .ppt and .pdf that would be used in the course. But if you’ve ever used OpenOffice for anything, you’ll know that it’s pretty clunky. Moreover, it didn’t have a native feature to export the slides as images — a trick I learned at the 2013 Author Summit in February — and I had to download an extension to get it to do that (and even with the extension, it was still pretty clunky. I’ve also found that the image quality in outputting slides as images is a lot better in Keynote than in OpenOffice). I eventually gave up and got a copy of iWork (you know, because I’m on a Mac) and have been using Keynote ever since and it’s much easier to use.
The slides are an extension of the outline and the script. They are broken up into sections based on the ideas that were first saved as “cards” in Trello and adapted into sections in the outline with more detail added based on the actual script. I first save each module’s slides as a separate Keynote file, then export to PPT, PDF and then images, and I store them in different locations…
Directory structure
It’s about this time — since now I’m creating files that are going to be going into the actual course files — that I start creating a directory structure. My courses have 2 folders — one which will be named the slug of the course I am currently working on, e.g. /my-pluralsight-course/ — and the other which will be the same thing with -work at the end of it, e.g. /my-pluralsight-course-work/.
The first one will have everything that I send off to the content editing team at Pluralsight. The second one will contain all the work files that I will use to create the course. This is where my Keynote files go, whereas the actual /my-pluralsight-course/ folder is where the PPT and PDF files will go.
I also create a folder named /img inside the -work folder, and that’s where I dump the output of exporting my slides to images. Later, I’ll add a /camtasia folder (for Camtasia files) and an /audio folder (for rendered and work audio files). This time around I also stored my demo code in the -work folder (which I could then compress and copy into the course folder) and any other files I create or use in the actual course.
Demos
For this course that I’m finishing up, I started doing something a bit different that I realized was really critical; preparing the demos (and the demo code) before doing the audio and video. This is because, when you’re writing out a description of what you’re going to do (like I am, when I’m writing the script), it’s easy to forget or miss things that may ultimately lead to bugs in your code. And if you’re recording the audio before doing the video, you’ll already have rendered audio for the broken code and may need to go back and re-record parts so you can describe the right way to show whatever it is that you’re trying to show.
Preparing the demos first means you can do all your debugging before you even start recording and you can have some ideas about how you want to present your demos in the course. It also means that if things change from the way the script was written, you can make those adjustments to the script before recording the audio.
Since all my courses are WordPress-related, my demos are usually WordPress plugins or themes and to test/use them, I need to work in a local MAMP install. Once I have everything working, though, I can copy the plugin or theme into my course -work folder, then create a zip file to copy into the course folder.
This time, too, I also created a separate Sublime project which contained both course folders. I do my normal development in Sublime, so that’s natural for creating any demos, but I also created a couple of Sublime snippets that I can use for creating the course and module meta files that are used to put the course up live. Previously, I was just using an old meta file and using Sublime’s multiple cursors to select all the instances of the old module slug and change them to the new one, but this saves some extra time highlighting the old module and section titles by allowing me to just tab to those to change them.
Audio
As I said, I write my entire script first. Recording the audio goes through two stages. First, I’ll set out a time when I have about 3-4 hours to record. During this time, no one else is home, I shut down my other computer and I keep the bird in the other room. The dog, well, we just edit him out and give him dirty looks when he barks at people passing the front door.
I’ve got a Rode Podcaster mic with a pop filter on a Rode swivel boom arm. I learned the hard way that the boom helps immensely in your signal-to-noise ratio (that is, the signal — your voice — to noise — everything in the background) because you can get the mic much closer to your face and not have to lean over it to get close. I was previously using a Blue Snowball (which I still have) on the same mount, but I’ve found that the audio quality seems to be a bit better with the Rode.
Another piece in this puzzle, of course, is other noises. You need to eliminate them as much as possible. I don’t type or do anything on the computer when I’m recording the audio, so I don’t need to worry about tapping from the keyboard (or getting a shock mount), but I also use an exercise ball as my computer chair, so I also don’t need to worry about chair noises. I don’t have a soundproof room, so getting rid of these sounds that I can prevent are key. The only things I have to worry about is noises coming from the street — particularly large trucks — since the computer room has a street-facing window beyond which is a fairly busy street, so time of day to do the recording becomes a factor (e.g. it’s a bad idea to record around 5pm or 8am).
I’ll record the whole course straight through, taking bathroom or whatever breaks in between modules. I’ll record each module separately and store them in module-specific folders in my -work folder. I’m a musician, and I use Ableton Live, so all my voice recording goes through Ableton.
Once I’ve recorded all the audio I edit out any bad takes and run everything through an Ableton rack I built specifically for voice recording. The rack is a combination of a number of audio processing tricks I also learned at the Author Summit this year and includes a Gate — to eliminate background noises when I’m not speaking — a Compressor — to boost my voice when I am speaking — and a Limiter, to duck the signal if it ever peaks enough to cause distortion. The Compressor is pre-configured to boost my voice and the Threshold is also pre-configured to match my normal speaking voice (though I do make occasional adjustments if it starts swallowing up words).
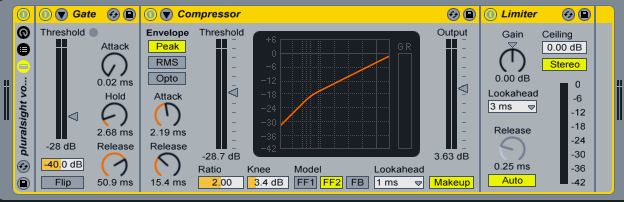
If you’re doing this yourself (outside of Ableton or configuring my rack for your own use), this is a good guide for how to use compression on voice and why you’d want to. For Gaters, the trick is to lower the threshold to the point where it stops sounding like a bad cell phone reception (dropping in the middle of words) but not so low that you are still picking up background noise.
So, I throw my rack on the voice track, then I edit it, and I break the track up into chunks for each section/clip. I’ll color-code each clip so I can see, visually, where it starts and ends. The result looks like this:

From there, I can select the chunk I want to export, and export just that section as a .wav file. I’ll do this for a single module, then move on to editing the video for that module so I can finish a module and hand it in, then start working on the next module. Camtasia for Mac’s audio processing capabilities are pretty lacking, so using an external program like Ableton Live lets me do the audio processing stuff in a native application built for audio processing stuff.
Video
At this point, I’ve got half of what I need for the module already done. I have the slides — each rendered as images — and I’ve got the audio — already filtered and ready to go. The reason I like exporting the slides as images is that it gives me much more control over the timing, which is important because I’ve recorded my audio beforehand. Before doing this, I would play the audio back and try to time my slide transitions with the audio as it was playing, but inevitably, I’d get things wrong. Now I can find the peak in the audio that I’m using as a reference point and time my slide change to that and have it trigger exactly when I want it to.
But Pluralsight courses aren’t all about slides. They are also about showing your work. So I need to do some screencasting. One thing I did for the last couple courses was switch my theme in SublimeText to something lighter, specifically the Soda Light theme. Besides liking it, personally, the white background means I can take screenshots of code in Sublime and put them into my slides and it matches the slide, rather than what it would look like with a dark theme.
I start the Camtasia project by importing all my slide images, and then import the audio file for the module I want to work with. I save this as a file named -c, e.g. my-pluralsight-course-01c01, which is also how I name the video files.
The easiest modules are the ones that are mostly slides, the hardest the ones that are mostly demos. Easy and hard is relative, of course, and the hard ones aren’t hard so much as they’re just time consuming. This is why it’s important to have the demos prepared beforehand, because if you’re coming up with the demos at this point, then you’re going to be spending a lot of time working on those when you could just be recording stuff.
I have two monitors, so the way I do my recordings is set up one monitor with the resolution recommended for Pluralsight videos (1024×768) and I set Camtasia up to record from that monitor. When I’m doing demos, I’ll have my original code up on my main monitor (my iMac) and type out that code into a new Sublime window on the monitor that Camtasia is recording from.
Camtasia lets you adjust the video speed pretty easily, and I’ll time my recordings to correspond with what I’m saying on the audio track. I talk fast, so I’ve started trying to add breaks in the audio so the video of me doing whatever I’m doing (generally writing code) doesn’t look quite as insane.
Once a clip is done, I save it again, then export it with the highest possible quality settings as an .mov file to my course folder. (Pluralsight video editors then take the .mov and re-encode it as a .wmv which is the format the player needs. This is why I try to export the file with the highest quality I can, to try to alleviate any re-encoding compressor issues.) Then I move on to the next clip.
Finishing up
The last step is making the additional files needed for the module before handing it off, specifically the module .meta file (which is a custom xml file) and the questions file that will be used for the assessment questions in the course. As I said, I now have a Sublime snippet that I can use for module (and course) meta files, which makes this step pretty simple.
As a rule, I try to come up with at least 3 questions per module no matter how long the modules are (it’s recommended you have 1 for every 5 minutes, I believe, so this seems to average out about right). I try to come up with the questions right after I finish the module, so they are fresh in my head, but this is still a tough part of the job. I’ll often look at my slides or my script to get ideas about what I should ask.
After that, all I should need to do is hand off that module to my editor. If I have time, I’ll watch my clips one more time, but generally I’ll do this anyway before rendering the video.
That’s pretty much my whole workflow. You can check out my Pluralsight courses here and I’ll update this post if my workflow ever changes.
Leave a Reply